FOXWELL NT301 OBD2 Diagnostic Scan Tool

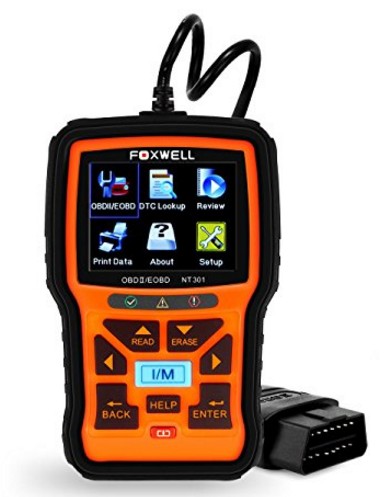
This OBDII scan tool has a large color LCD display to make navigation very simple and easy. The tool is protected by a rubber surround to absorb any minor shock from use. The unit does not require any batteries to operate. Most cars manufactured from 1996 will support OBDII diagnostic. All you need to do is plug it into your car’s OBDII (DLC) port and it will power up using the car’s power. You can then start the vehicle to read any trouble codes or pending codes. If there are trouble codes, you can use this tool to erase the code. Of course you should fix the issue or else the code will return.

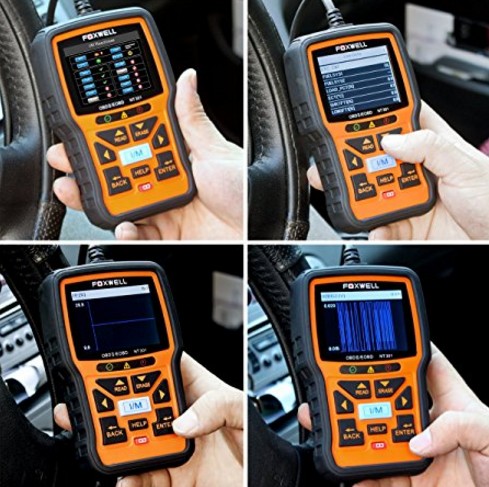
The tool also have quick access buttons to read codes, erase codes, and I/M readiness check. There are 3 LEDs in the middle of the screen to show you if you have any trouble codes, or pending codes along with audible beeps. If you want to venture into more advanced features, this tool is able to show live data and record data. You can also connect the unit to a computer with the included USB cable to print the test result. There is an option to look up definition of trouble codes simply by entering the trouble code. Once you are done, just unplug the unit from the car and put away the tool. Can’t be any simpler. Overall it’s a well designed tool for all the DIYers.


ANCEL BA101 Professional 12V Automotive Digital Battery Tester (100-2000 CCA)

Got this Ancel BA101 to test my car battery. The unit uses the car’s 12V battery to power itself. All you need to do is connect the positive and negative clamps to the car battery. The tester has 4 buttons on the front, and a backlit LCD display. On the side, there is a mini USB connector used for connecting to a PC to print the test data. You can easily navigate through the menu to test the battery in vehicle, or test the battery if it’s outside the vehicle. The testing takes only about 8 seconds to perform and will display the test result showing the CCA (cold cranking amp), internal load resistance, and the voltage. The bottom of the screen shows an easy to read status for GOOD, or GOOD RECHARGE, or BAD REPLACE. All the information is found in the user guide. The LCD display is also backlit, so it’s very easy to read even at night.

You can also test the cars starting system, and the charging system. When you test these parameters, you will be instructed to start the vehicle and rev the engine to 2500 rpm for 5 seconds. Then the tester will begin the testing. After a few seconds, it will tell you if your starter or alternator is in good working condition.

I was able to test my battery quickly and found that I will need to recharge it before use. The tester is compact and I will leave it in my glove box so if I ever need to test the battery, I will have this tool on hand.


Gates 91132 Belt Tension Tool To Adjust Tension On Drive Belts

I think this device works but there are definitely many ways you can easily mess up when using it. You can take 5 measurements and 3 of them might be the same. You will have to take mulitiple measurements. Also many location of the belts are in an awkward location where you can barely get your hands on and this will also make proper measurement difficult. This tool can be good to give you an idea if you are close to your target. So bottom line is I would continue using it as it would give me a better idea of the tightness and better than the finger method.

Timken HA590046 Bearing Hub Assembly for my 2004 Nissan Quest

Ordered this Timken bearing and hub assembly for my 2004 Nissan Quest. This was for my front passenger side. 3 months ago I got a local shop to replace the driver’s side that was making noise, and he used Nissan part which cost $190. The job cost me $400 total. With the passenger side going bad this time, I did some research and found that it’s not that difficult to do yourself.

So I ordered this part from Amazon and it got delivered in 3 days. Just in time for me to get the job done on a Saturday. So thumbs up to this seller. This bearing is of excellent quality and it’s made in USA.

For this job, you should use an air impact wrench, and a 6 point 32mm impact socket for the axle nut. There are 4 (17mm) bolts holding the hub assembly. For these, use a 3/8″ socket set and an extension. Don’t forget to remove the ABS sensor before pulling the hub out. This part is very expensive so you don’t want to break it.

To make this job go much easier, go to Auto Zone and pick up a bottle of CRC Freeze Out. This stuff will magically loosen all the rust on parts and get the bolts out 10X easier.

When you put everything back together, you should use a torque wrench to make sure everything is torque to spec.

If you working on the 04-09 Nissan Quest, here is the torque spec:
Axle nut 32mm: 92 ft-lbs
Rear hub assembly bolt 17mm: 44 ft-lbs
Caliper bracket holding the rotor 22mm: 115 ft-lbs
ABS sensor bolt 10mm: 15 ft-lbs

By the way, both front bearing on this Nissan went bad at around 72000 miles. I am not sure if this is normal but hopefully I won’t have to replace them again anytime soon.